Showing posts with label DIY. Show all posts

Saturday, June 9, 2012

New Homemade Shampoo Recipe

After reading 5 best essential oils for beautiful hair and the oil cleansing method I decided to re-work my homemade shampoo recipe (conditioner recipe too). The original works great but this one works even better. Not only does my hair look better, but my scalp feels better.

1.5 tsp baking soda
6-10 drops or 1/8 tsp tea tree oil
6-10 drops or 1/8 tsp jojoba oil
6-10 drops or 1/8 tsp sage oil
6-10 drops or 1/8 tsp rosemary oil
1/4 cup water
1/4 cup liquid castile soap (I used Dr. Bronner's unscented/baby)

Mix ingredients together in an old shampoo bottle, do not shake, just swirl it around a little bit every time before you use.

For ladies with long hair, I start from the base of my neck at the roots and work my way up to get all my roots washed, then squeeze extra shampoo into the rest of you hair. I let it sit in my hair for a little bit (10-30 second) and rinse out. It felt really weird using it the first time because your hair kinda feels greasy after but trust me it all turns out fine in the end. Also I only wash my hair every other day.

The tea tree oil is great for treating dandruff and psoriasis and has anti-bacterial and anti-fungal properties. The jojoba oil is a great cleansing oil and is helpful in treating ache. The sage oil helps balance scalp oils and helps to normalize hormone levels. The rosemary oil encourages hair growth and is helpful for treating both dandruff and psoriasis.

So you might ask...why go no poo? read all about it on The Crunchy Wife!

Rosemary, Sage, Tea Tree and Jojoba oils

Saturday, May 5, 2012

A Very Hungry Caterpillar Inspired Birthday Party

Happy Birthday to my little guy!

Papa Murphy's cheese pizza with pepperoni, mushroom, olive, and bell pepper caterpillars, with basil leaves.

funky but fun...a hungry caterpillar balloon

Leaf wine charms and straws.

Arranging cupcakes

Voila! Jellybean eyes/nose, gummy worm antennae and chocolate chip feet.

Butterfly favors.
We kept it small...just some family friends, but I still wanted to make it a bit special. I like to be frugal so this is what we ended up with...funky but fun. He had a blast and didn't end up falling asleep until around 10:30!

Pinterest was a major help in getting creative along with the clearance wall clings we found to decorate the windows...they are now on his bedroom window. Once we choose the theme it was hard not to get to carried away...so many fun ideas but we focused on keeping it frugal and fun.

The original plan for the head of the caterpillar was a doughnut with red sprinkles but when I went to pick it up from the store (I pre-ordered to make sure I would have it) they had made the wrong thing, a rectangle instead of a circle...annoying. I tried to come up with a fix by just getting another doughnut but they "were out" of any circle doughnuts! They offered to let me talk to the manager and my thought was..."what is he a magician?" Hearing sorry from another person is not going to change the fact that you messed up something really simple. Then she said "well do you still want it?" Really? Come on! Sorry for the rant. :)

So I went home to try and come up with a solution...I made a little cake I thought would work for the head but after it was done it just looked way to big so I just used another cupcake and turned the extra cake into a sun. We used those new frosting's that you choose the flavor and add it to it. We used Mint Chocolate Chip to get the minty green color. All the kids were happy and all in all it turned out great. I cannot believe my little guy is 3!

Thursday, April 5, 2012

DIY Easter grass: updated


My mom found this great idea at Carissa's Creativity Space. Its really easy, fun for kids and cute! Basically you are growing wheat grass so you could also add it to a smoothie when your done using it for its cute purpose. Its so quick to grow, the first and second pictures were only taken a day apart, and this morning its even taller. We made two to place on the table for decoration. The little guy really enjoied helping.

So here we go:
Buy some wheat berries, we got them at Fred Meyer's bulk section. We soaked them for a few minutes before we "planted" them. Spread at least a half inch of moist potting soil in the container you plan on using. Then sprinkle soaked wheat berries over the top, we placed cling wrap over the top to keep the moisture in. Make sure to give it air though otherwise you might develop mold. Keep them moist but not soaking. In a few days they will sprout and start growing. Check out her post for more info.


Wednesday, March 7, 2012

Tips and Tricks: Cookie Dough


We love cookies but most of recipes make way to many. I try to control myself but I love them to much. This trick helps because we make one batch and divide it into three. We bake off the first third and then freeze the rest. Just plop out the other two thirds onto cling wrap, roll up and toss in a freezer bag. Make sure you mark it with the temp and time. Then you can pull it out, slice it up, then defrost and bake. It works great.

We also add oat flour to our regular chocolate chip cookie recipe, replacing 1/2 cup of the flour with oat flour. We make oat flour by food processing oatmeal, it works great. Now I want to make chocolate chip cookies!

Sunday, February 26, 2012

Homemade Shampoo and Conditioner: Updated

Check out the new Homemade Shampoo Recipe here!

I found a couple recipes that I liked so I mixed them together to create what I needed. I used Stimulate from instructables and Quench from instructables to create a shampoo. Then I used a couple different recipes mixed together from Hazel Tree Farm for the conditioner.
Here's my shampoo recipe:

1 tsp baking soda (skip if using the baking soda cleanse, see below)
1/4 tbsp aloe gel (optional, I now skip this step to avoid extra build up)
1/4 tsp avocado oil (optional)
1/8 tsp tea tree oil
1/4 cup water
1/4 cup liquid castile soap (we used Dr. Bronner's Peppermint, but understand that it is strongly scented. We are used to it because we also use Dr. Bronner's peppermint bar soap)

Mix ingredients together in an old shampoo bottle, do not shake, just swirl it around a little bit every time before you use.

For ladies with long hair, I start from the base of my neck at the roots and work my way up to get all my roots washed, then squeeze extra shampoo into the rest of you hair. I let it sit in my hair for a little bit (10-30 second) and rinse out. It felt really weird using it the first time because your hair kinda feels greasy after but trust me it all turns out fine in the end. Also I only wash my hair every other day.


Here's my conditioner recipe:

2 tbsp apple cider vinegar
2 tbsp-1/4 cup fresh rosemary
1 1/2 cup water

Bring water to a boil, throw in rosemary and steep for at least 2 minutes. Remove rosemary and cool water. Add rosemary water and apple cider vinegar to a spray bottle.

After shampooing hair spray water/apple cider vinegar solution all over hair and rinse well. I usually do this twice and it seems to work really well.

After about a week of using them and reading this blog post (on just a couple acres) I decided that I wanted to try a baking soda cleanse to get rid of any old build up from the old store bought shampoo and conditioners. I never got around to trying it so I finally mixed 1 tsp of baking soda into the double batch of shampoo I had already made.

It took a few weeks for me to really get the recipe worked out perfectly. I think it also just takes a few weeks for your hair to adjust to the change. Here is another great blog post about going no 'poo' written by The Crunchy Wife. It explains more about the advantages of going "no poo" and the disadvantages of store bought products. Now I understand why I have the whole dry/oily scalp problem.

I love the way it is all working, my hair actually feels much cleaner and its much much easier to brush. I also feel like I am wasting a lot less water. We have a water softener so it takes a long time to really get store bought conditioner rinsed out of my long hair. The homemade rinse comes right out! I have also noticed that my hair is much less oily. It used to get pretty oily by the end of the second day but now its barely oily at all. Plus I can tell that my scalp is in better shape, not dry or itchy anymore. Sorry I have no before and after pictures. I forgot to take a before, so now an after is pretty worthless.

I learned a little more about how helpful the tea tree oil and rosemary can be for your hair through this article about the 5 best essential oils for hair, check it out!

Wednesday, February 15, 2012

How to make dishwasher detergent

Recipe from Flitterbugs blog.

1 cup borax
1 cup washing soda (she says that baking soda works just fine too, we just already had washing soda)
1/2 cup Kosher salt
1/2 cup citric acid (found with the canning stuff, or use 15 packs of unsweetened lemon Kool-Aid)
vinegar

Mix all ingredients, except vinegar, in a air tight container. Use about 1 Tbsp per load in the dishwasher. Don't skip this step. Fill rinse-aid container of you dishwasher with white vinegar. This helps to prevent a cloudy build up, especially on plastics.

She recommends using a regular detergent once a month for one load to prevent the plumbing from clogging up. So far it has been working just as good as store bought, plus its much less expensive.

Sunday, February 12, 2012

DIY Stir Fry Seasoning Mix

3 Tbsp cornstarch
2 Tbsp sugar
2 Tbsp onion powder
2 Tbsp garlic powder
2 tsp parsley
1 tsp ginger
1/4 tsp paprika

Mix all ingredients together in an air tight container, we used a canning jar. It nice to know that there is not MSG in it, and we will never be out of it when we want stir fry on a whim. It is much less salty than the store band, and I think it tasted much better.

Mix 1 Tbsp of dry mix into 1/2 cup chicken stock, plus 1 Tbsp soy sauce. Make sure it is cold. We also added about 1/16 tsp of sesame seed oil but that is optional.

Then saute up your veggies, meat, etc and near the end pour over sauce and saute on med/low heat until sauce thickens. Enjoy!


Using the silicone baking cups freezer trick is a great way to have the right amount of chicken stock frozen. Then just pull out what you need and defrost, instead of opening a whole jar of chicken stock.

For the original recipe click here

Friday, February 10, 2012

Homemade 409 recipe

2 tbsp. white vinegar
1 tsp borax
1 cup hot water
1/8 cup dish soap

Pour all ingredients, except the dish soap, into a spray bottle. Fill til almost full with cold water, add dish soap. It works really well and it smells just like 409! Recipe from The Frugal Girls website.

Thursday, February 9, 2012

DIY Taco Seasoning mix

1/4 cup chili powder
1 1/2 tsp onion powder
1/2 tsp paprika
1 1/2 tsp garlic powder
1 1/2 tsp cumin
1 1/2 tsp oregano
1 tsp salt
1 tsp pepper

Mix all ingredients together in an air tight container, we used a canning jar. It nice to know that there is not MSG in it, and we will never be out of it on taco night. I think it tastes way better then the packets.

Substitute 2 rounded tablespoons for 1 packet of taco seasoning.

I found this recipe on Smashed Peas and Carrots website.

Stay tuned by following our blog for more fun recipes. We have a Stir fry seasoning mix coming soon.

Tuesday, January 31, 2012

Tips and tricks: Silicone baking cups


We came up with this trick since we have an ice maker and no ice cube trays. It actually works great and you can freeze in the perfect amount, about a 1/4 cup. Just fill silicone baking cups with desired amount and freeze. Then pop them out and into a freezer bag. We use it for yogurt for smoothies, juices for smoothies, chicken and veggie stock, and pesto.

What else would it work well for? See the commets for more ideas.

Wednesday, January 25, 2012

How to make laundry detergent


I found this recipe via Pinterest (click to find me on pin) from icanteachmychild.com, who got it from the Duggar family's site.

Ingredients:
1/2 cup Borax
1 cup Arm & Hammer Super washing soda (not baking soda)
1 Fels Naptha soap bar, grated (I thought this was going to be really hard to grate but it was easy because the soap is soft)
5 gallon bucket with lid (or something to cover it with)
5 one gallon jugs (old milk jugs work great)
Funnel (we had an old one we used for oil)
optional: Essential oil drops for fragrance (I really liked the smell of the Fels Naptha soap so we didn't add any)
optional: paint stirrer drill attachment

We found all of it at Walmart and already had the 5 gallon bucket. We have been saving milk jugs to reuse. Check out the icanteachmychild.com website for more info on the price. The second time you make it, it is even cheaper because you only need to buy the Fels Naptha soap. Also you can use the borax and super washing soda to make your own dish washer detergent (I will write a post about this too).

Here is how to make it:

Start by grating the Fels Naptha soap. Like I said, I thought this would be hard but it was actually easier then grating cheese. Place grated soap into a pot with 4 cups of water. Stir continuously over medium low heat until all the soap has melted. It took about 10 minutes.

Fill the 5 gallon bucket half way with hot water. Pour in the soap mixture and stir it up. Then add 1/2 cup borax and 1 cup Arm & Hammer Super Washing Soda and stir. The website said to use a paint stirrer attachment for a drill, but we didn't have one so we just used a spoon and it worked great..

Then fill the balance to reach a total of 5 gallons. Stir, cover and let sit over night and it will thicken up. Then mix it, this is were a paint stirrer drill attachment would be really helpful. It got really chunky and mixing with a spoon was hard. The recipe tells you to fill the 1 gallon jugs half with the detergent and half with water.

We decided to keep it in concentrated form to store it, but you still want to put it into 1 gallon jugs so the concentration does not get messed up. Then mix half water/half detergent to keep in the house. We also are going to use the concentrated version in a small bottle to see if we can use it as a stain remover.

The recipe says to use: (shake the container first)
1/4 cup for a front loading (he) machine
5/8 cup regular top loading machine

We tested it on a load that included my husbands work out clothes, along with other stuff...my toddler is in the middle of potty training...hint hint. The clothes came out smelling clean...so it works! I did use a little more then recommended because we used the extra large load setting. We found it helpful you use an old laundry detergent bottle for storage inside because it has the measurement in the cap. Stay tuned by following our blog for more how to and homemade recipes.

Tuesday, January 24, 2012

How to clean your house in about 30 minutes a day or less

...unless you can do it under 30 minutes a day...right? :)

I got this idea from apartmenttherapy.com (click to check out there list) and loved it. So I made a few adjustments to fit our house and added some days of rest. We do our laundry and dishes everyday, so I left them out.

1. Change and wash sheets and towels, vacuum
2. Sweep and mop great room (or everything if you don't have a "great" room) and wash rugs.
3. Clean bathrooms
4. Take a rest; put your feet up and relax
5. Clean extra bedrooms
6. Clean entry way and stairs
7. Dust everything
8. Change and wash sheets and towels, vacuum
9. Sweep, shake out rugs
10. Clean car
11. Deep clean kitchen, the stove, baseboards, etc.
12. Clean laundry area
13. Clean showers
14. Clean bathrooms
15. Clean bedrooms
16. Change and wash sheets and towels, vacuum
17. Take a rest; put your feet up and relax
18. Sweep and mop great room.
19. File paperwork
20. Dust everything
21. Clean bathrooms
22. Sweep, shake out rugs
23. Wash blankets and vacuum curtains
24. Dust blinds, clean fans, vacuum couches
25. Change and wash sheets and towels, vacuum
26. Wash and vacuum baseboards
27. Sweep and mop great room.
28. Take a rest; put your feet up and relax
29. Wipe out fridge and purge old food
30. Reorganize something (pantry, linen closet, etc.)
31. Choose a seasonal chore (clean the fireplace, clean the porches, etc.)

The first month it will probably take more time since some of the stuff has not been done in awhile. I wanted to make sure somethings got done once a week, while others only once or twice a month. We are lucky and have a huge house but it makes cleaning overwhelming sometimes. With this I can get something done everyday. Plus I look at the list and I think...hmmm...I only have to get one thing done today, I hope it helps!

Sunday, January 8, 2012

Homemade Biodegradable Seed Starters: Updated

Update below.

I found this the other day and thought I should share it. Homemade Biodegradable Seed Starters from Toilet Paper Tubes...what a great idea, right?


All you have to do is cut a toilet paper tube in half (or a paper towel tube in quarters or maybe more) and fill it with potting soil, then use as you would normally use a seed starter. Simple...easy...and best of all, FREE! Thanks goes to NW Edible for the idea! :)

So after trying this...I DO NOT recommend it. Once wet the glue released and created a mess. They fell completely apart. I guess you could put tape around them and then take it off when you transplant but I would just recommend using something else. Sorry if any of you already tried it.

Tuesday, October 18, 2011

A green alternative to store bought sponges...Knit a reusable one!

I recently realized how wasteful I was when it came to sponges. They get dirty so fast and there is really no way to sanitize them. So what to do? Stop washing dishes...no! It relaxes me...one thing I actually enjoy doing...I know I'm weird. I decided that I would knit something to replace them, it was really simple.

Basically knit (or crochet) a square double the size of a regular sponge, then fold in half and sew shut...your done! I used cotton yarn so that I could just throw it in the washer and dryer. It doesn't dry out very well so I recommend making at least three depending on how often you do laundry. I also made one in a different color for the bathroom, this way I will never get confused. I'm somewhat of a germ freak when it comes to certain things, toilets being one of them.

I have been using these for the past 6 months and they have been working great!


Thursday, October 13, 2011

Root Simple: Quick and Easy Fire Starters

We made these last week with things we had around the house.

Root Simple: Quick and Easy Fire Starters: "I came across these fire starters this week while sorting out our camping gear, and thought I should blog about them..."

I suck at starting fires...the doctor is always in charge of the fire but using fire starters makes it pretty easy to start a fire. So when I found these on one of the blogs we follow, we figured we might as well try them. Wow, they work really well! He decided we needed to used 6 to start a fire. Of course you really only need one or two.

You really only need a paper egg carton, dryer lint, and an old candle. So much cheaper than buying fire starters at the store. I also feel like they are probably better for the environment. They were so easy to make and use. These would be great for campers and fires at home.


Thank you to root simple for the info!

Wednesday, September 28, 2011

How to make handmade eczema cream: Updated

Please note this blog is no longer updated. (Click here to find my new blog address).


See botton for update.

Our little guy has an eczema looking rash as of late so when I saw the recipe for eczema cream on A Sonoma Garden I knew we should try it.

Instead of using the shea butter and following the recipe exactly we decided to use the hand lotion recipe we converted instead.

1/2 tablespoon of avocado oil
1/2 tablespoon of vitamin E oil
Olive oil
1/4 cup + 1 tablespoon emulsifying wax
1/2 water

In a Pyrex measuring glass combine the avocado oil and vitamin E oil, add olive oil to make 1/4 cup total. Then add emulsifying wax and microwave for 1-1.5 minutes or until it is all melted. The temperature on this should read about 155 degrees. Microwave the water for .5-1 minute or until 120-125 degrees. Then pour the hot water into the wax/oil mixture, gently stirring and watch it turn milky white. Then pour the hot lotion into wide mouth pint size jar and place in an ice bath (basically ice and water surrounding it), remove and let cool overnight.

It may be a little separated or have watery (should be 2mm or less) stuff at the bottom, all you need to do to fix this problem is stir it up, then becomes the perfect consistency and stays that way.

I was planning on using it on Gnar for a week to see how well it worked but to my surprise in three days the rash was gone! It worked really really well and also works great for bug bites. The rash came back and we've started using it again.

Since they do not sell emulsifying wax where we live, we got our emulsifying wax from Mountain Rose Herbs, and they also carry avocado and vitamin E oil. I was bummed not to be able to get it from a more local source (especially since the shipping cost was almost as much as the order), but now we know that we like it so I can order a lot more at a time and/or next time I head up to Oregon to visit family I can get just pick some up. The avocado oil was a bit pricey and I had to get it at S&S produce but I think it will still be less expensive then a pricey eczema cream. The vitamin E oil I found at Trader Joe's and it was not to expensive.

Original recipes from A Sonoma Garden!

After making and using the recipe for several months I have realized that it molds within about a month. My recommendation to combat this problem is to store it in the fridge and make only half of a batch. Here is the half batch recipe:

1/2 tablespoon of avocado oil
1/2 tablespoon of vitamin E oil
add olive oil to make 1/8 cup of total oil
1/4 cup water
2 1/2 tablespoon emulsifying wax

Friday, September 16, 2011

How to make handmade lotion: Updated

Please note this blog is no longer updated. (Click here to find my new blog address).


See bottom for update.

Yesterday we made handmade lotion using the recipe from A Sonoma garden! It was so easy and quick. We choose to infuse the olive oil with herbs in the crock pot for a day and strain it instead of adding the extract. We used 4 cups of olive oil, 1/2 cup of dried lavender, and 4 dried white/culinary sage leaves. We put it in the crock pot for a day on the warm setting and then strained out the herbs.

In a Pyrex measuring glass combine the olive oil and emulsifying wax and microwave for 1-1.5 minutes or until it is all melted. The temperature on this reads about 155 degrees.  Then microwave the water for .5-1 minute or until about 120 degrees. Then pour the hot water into the wax/olive oil mixture, gently stirring and watch it turn milky white. Then pour the hot lotion into wide mouth pint size jar(s), and place in an ice bath, basically ice and water surrounding it, remove and let cool overnight.


Some people commented on the recipe saying it separated or was watery at the bottom, which happened with our first batch. So we changed the recipe a bit by reducing the water to 1 cup and we also put the hot lotion immediately into an ice bath, it also separated. So for the third batch we tried 1/2 cup water, 1/4 cup infused olive oil and 1/4 cup + 1 tablespoon emulsifying wax. It was almost perfect...but since we are perfectionists...we tried again. It only really had about 2mm of water at the bottom. For our fourth and final batch we used 1/4 cup olive oil, 1/4 cup + 2 tablespoons emulsifying wax, ten drops peppermint extract and just under a 1/2 cup water, and then put it into the ice bath. It ended up pretty thick, so we will use it as foot cream for a gardener feet!

I would say that the third batch was the most perfect and all you need to do to fix the small bit of water at the bottom is stir it up once, it then becomes the perfect consistency. So the perfect recipe is:

1/2 cup water
1/4 cup infused or regular olive oil
1/4 cup + 1 tablespoon emulsifying wax

Since they do not sell emulsifying wax where we live, we also got our emulsifying wax from mountain rose herbs, and since you have to order $10 worth of stuff we also got Garam Masala. I was bummed not to be able to get it from a more local source (especially since the shipping cost was almost as much as the order), but now we know that we like it so I can order a lot more at a time and/or next time I head up to Oregon to visit family I can get just pick some up.

I am loving the fact that I now have hand-made lotion infused with herbs from our garden! I think the thing I love the most about it is that fact that it is not greasy, I'm kind of a weirdo about lotions and it's nice to find one I can make and use! I cannot wait to try some of the other recipes from A Sonoma Garden!

After making and using the recipe for several months I have realized that it molds within about a month. My recommendation to combat this problem is to store it in the fridge and make only half of a batch. Here is the half batch recipe:

1/4 cup water
1/8 cup infused or regular olive oil
2 1/2  tablespoon emulsifying wax

I have also read that sometimes added Vitamin E oil will help slow the molding. I recommend about a 1/2 tablespoon of vitamin E oil and then add the olive oil to make up the rest of the 1/8 cup oil. See my eczema cream recipe for help with this.

Wednesday, August 31, 2011

homeschooling a preschooler

Please note this blog is no longer updated. (Click here to find my new blog address).


We are taking our time to decide if we will be homeschooling or public/charter/private schooling the little guy but I wanted to start something with him at home to challenge him a little more. I started searching on the Internet and got a bit overwhelmed to be honest. This is what I finally came up with. It is very simple and easy but it gives us a focus for the week.

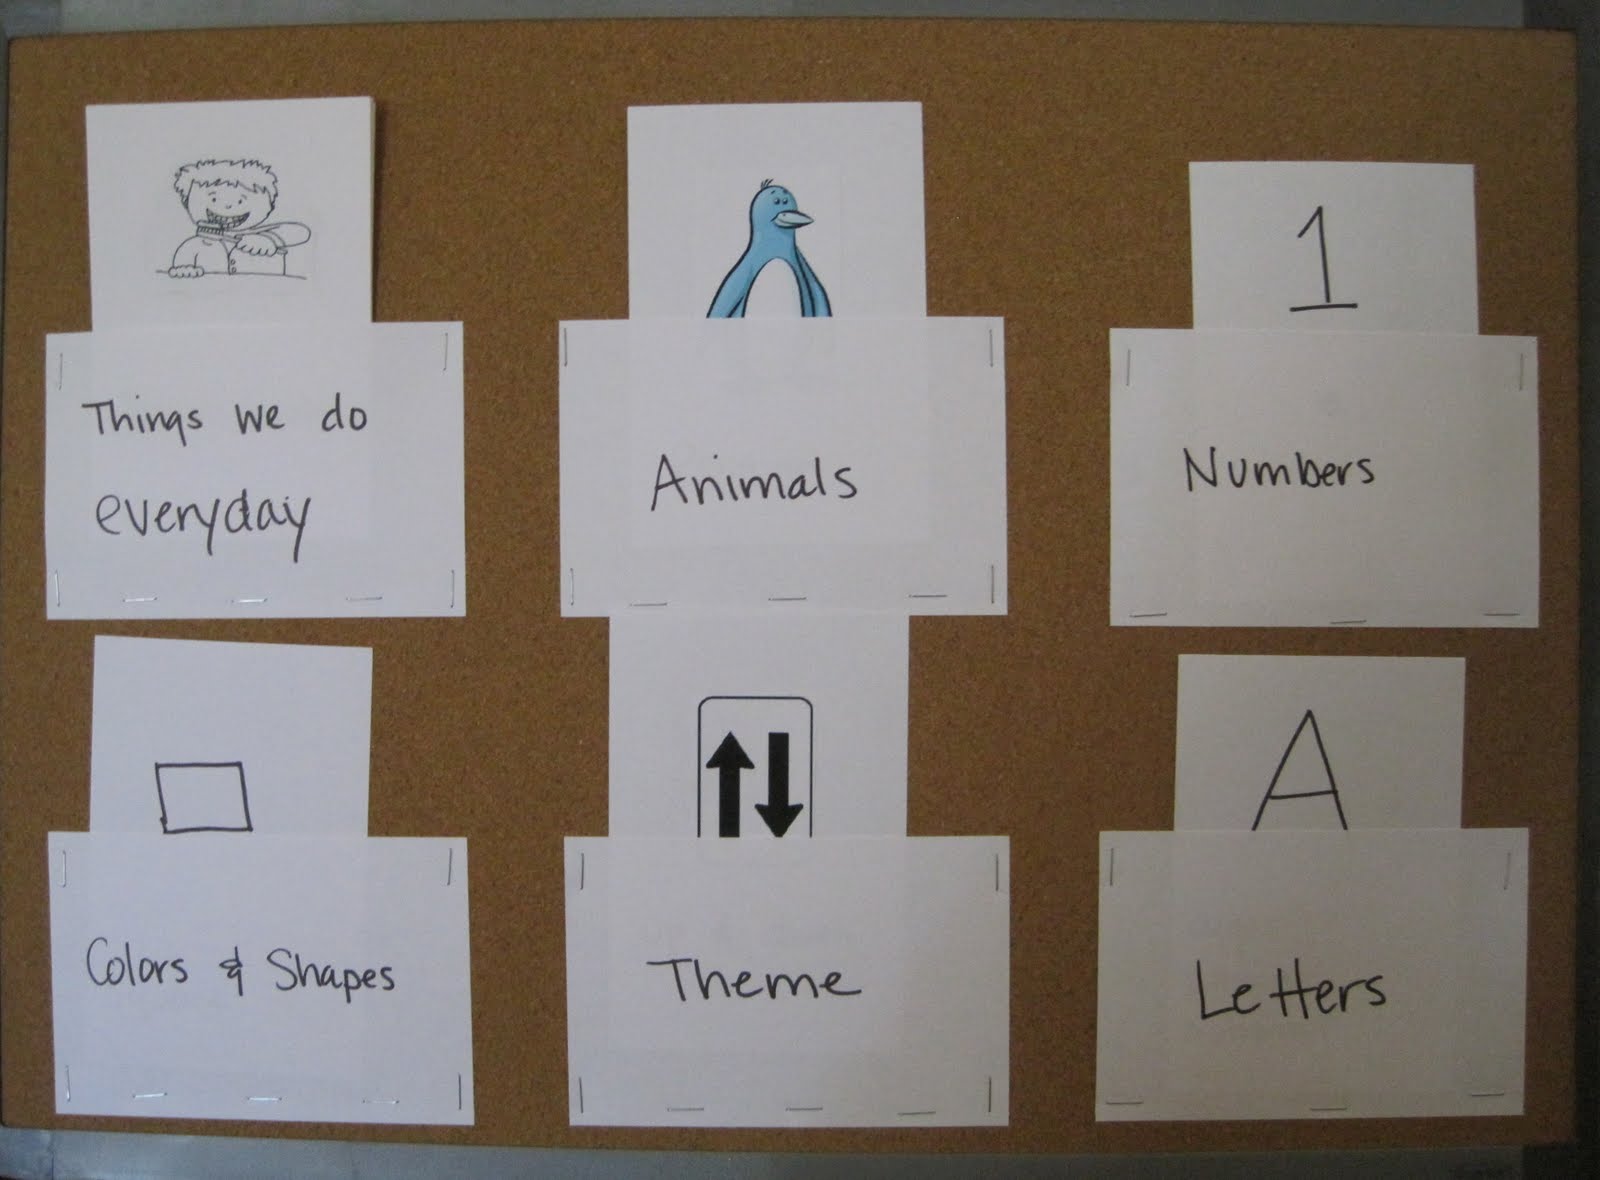
simple and easy...cork board with pockets
I put together a cork board with pockets for each category, which I will change out each week. We will focus everything(reading, puzzles, coloring, crafts, etc.) on the five things of the week. The category: Things we do everyday will of course not change. I plan on showing it to him on weekdays (we've started with three days a week) and then we will go on with our day. I will use it to focus on those things...pointing out the circle if it circle week for example.


Categories

Things we do everyday: brush teeth, listen, clean up, make our bed, get dressed, go potty, eat healthy, sharing, etc. I added this so we have a daily routine that he can look at and check off as he goes. Plus it enforces good daily habits.

Letters: A-Z adding three words for each, I choose some words he didn't know and some he knows but doesn't pronounce correctly.

Numbers: 0-20 adding the number in dots below. I just found this website that has printable letter and number flash cards, after I made them all of course.

Shapes/Colors: square, diamond, star, circle, rectangle, oval, heart, triangle, crescent, green, blue, red, yellow, black, white, brown, purple, pink, orange, and grey.

Animals: I came up with 26 (how many letters we have) that we had at least two examples of at home (from a book, toy, in the back yard, etc.).

Themes: up/down, tall/short, hard/soft, hot/cold, day/night, little/big, family, feelings, farm, jungle, transportation, body parts, plants, ocean, music, neighborhood, weather, emergency personal, forest/river and meals/utensils.

Sub-themes: birthday, Easter, 4th of July, Halloween, thanksgiving, Christmas, and seasons.

Most programs have you do 26 to go along with how many letters but I plan on rotating the themes and using the sub-themes the weeks surrounding the holiday, weather pattern or season. I also felt that we should work on things he needs to know not add extras to make the amount work out.

Two websites I found helpful in creating our program:
Letter of the week
Our preschool homeschool

I also got a lot of help from my mom, who ran a daycare when I was a child. So far we are starting our third week and he seems to be really enjoying it. I have already noticed a few things that he has learned and a few things he is now pronouncing better. I will also post some of the crafts, science projects, games, etc. we come up with along the way.

Tuesday, August 2, 2011

How to turn an old shed into a chicken coop

Please note this blog is no longer updated. (Click here to find my new blog address).


We tried to buy as little as possible and use things we already had to build most of it. Our landlord told us he wanted to tear down the shed, and we asked him not to so we could turn it into a chicken coop. We found old tree branches and screwed them together to make the roost for them to sleep on, and every morning before they depart you can find them all on our make-shift roost.


Here is the outside caged area for them to run around in during the day, we will need to put them in at night to protect them from raccoons and sort. We kept it simple using old scrap 2X2s and posts to build somewhat of a cage. Then we covered the bottom half with poultry netting and the rest with deer netting, using staples and zip ties to keep it together. The girls did manage to get out of this part when they were still pretty small, so we placed old chunks of concrete and old pipes around the base to keep them from finding their way out.


This last part is the ramp/door combo we made for them. We just cut a large rectangle out of the side of the shed and attached it with a hinge and lock. This way we can pull them in at night and they have a ramp to get in and out.


We used these tubs for our garden last year and we had to drill holes in them to let water escape so they will be perfect as nesting boxes for the girls. Our neighbor grew nest egg gourds this year and kindly gave us a few as decoys for the girls to get the idea of where to lay their eggs.


We also cut holes up near the top of the shed and placed netting over them for plenty of ventilation. Chickens make a lot of moisture...I cannot stress enough how much moisture they make. So we attached a large fan near the top to create even more ventilation for them. The next project will be keeping them warm; something we'll worry about come fall.
Related Posts Plugin for WordPress, Blogger...