Showing posts with label tips and tricks. Show all posts

Saturday, May 5, 2012

A Very Hungry Caterpillar Inspired Birthday Party

Happy Birthday to my little guy!

Papa Murphy's cheese pizza with pepperoni, mushroom, olive, and bell pepper caterpillars, with basil leaves.

funky but fun...a hungry caterpillar balloon

Leaf wine charms and straws.

Arranging cupcakes

Voila! Jellybean eyes/nose, gummy worm antennae and chocolate chip feet.

Butterfly favors.
We kept it small...just some family friends, but I still wanted to make it a bit special. I like to be frugal so this is what we ended up with...funky but fun. He had a blast and didn't end up falling asleep until around 10:30!

Pinterest was a major help in getting creative along with the clearance wall clings we found to decorate the windows...they are now on his bedroom window. Once we choose the theme it was hard not to get to carried away...so many fun ideas but we focused on keeping it frugal and fun.

The original plan for the head of the caterpillar was a doughnut with red sprinkles but when I went to pick it up from the store (I pre-ordered to make sure I would have it) they had made the wrong thing, a rectangle instead of a circle...annoying. I tried to come up with a fix by just getting another doughnut but they "were out" of any circle doughnuts! They offered to let me talk to the manager and my thought was..."what is he a magician?" Hearing sorry from another person is not going to change the fact that you messed up something really simple. Then she said "well do you still want it?" Really? Come on! Sorry for the rant. :)

So I went home to try and come up with a solution...I made a little cake I thought would work for the head but after it was done it just looked way to big so I just used another cupcake and turned the extra cake into a sun. We used those new frosting's that you choose the flavor and add it to it. We used Mint Chocolate Chip to get the minty green color. All the kids were happy and all in all it turned out great. I cannot believe my little guy is 3!

Wednesday, March 7, 2012

Tips and Tricks: Cookie Dough


We love cookies but most of recipes make way to many. I try to control myself but I love them to much. This trick helps because we make one batch and divide it into three. We bake off the first third and then freeze the rest. Just plop out the other two thirds onto cling wrap, roll up and toss in a freezer bag. Make sure you mark it with the temp and time. Then you can pull it out, slice it up, then defrost and bake. It works great.

We also add oat flour to our regular chocolate chip cookie recipe, replacing 1/2 cup of the flour with oat flour. We make oat flour by food processing oatmeal, it works great. Now I want to make chocolate chip cookies!

Tuesday, January 31, 2012

Tips and tricks: Silicone baking cups


We came up with this trick since we have an ice maker and no ice cube trays. It actually works great and you can freeze in the perfect amount, about a 1/4 cup. Just fill silicone baking cups with desired amount and freeze. Then pop them out and into a freezer bag. We use it for yogurt for smoothies, juices for smoothies, chicken and veggie stock, and pesto.

What else would it work well for? See the commets for more ideas.

Tuesday, January 24, 2012

How to clean your house in about 30 minutes a day or less

...unless you can do it under 30 minutes a day...right? :)

I got this idea from apartmenttherapy.com (click to check out there list) and loved it. So I made a few adjustments to fit our house and added some days of rest. We do our laundry and dishes everyday, so I left them out.

1. Change and wash sheets and towels, vacuum
2. Sweep and mop great room (or everything if you don't have a "great" room) and wash rugs.
3. Clean bathrooms
4. Take a rest; put your feet up and relax
5. Clean extra bedrooms
6. Clean entry way and stairs
7. Dust everything
8. Change and wash sheets and towels, vacuum
9. Sweep, shake out rugs
10. Clean car
11. Deep clean kitchen, the stove, baseboards, etc.
12. Clean laundry area
13. Clean showers
14. Clean bathrooms
15. Clean bedrooms
16. Change and wash sheets and towels, vacuum
17. Take a rest; put your feet up and relax
18. Sweep and mop great room.
19. File paperwork
20. Dust everything
21. Clean bathrooms
22. Sweep, shake out rugs
23. Wash blankets and vacuum curtains
24. Dust blinds, clean fans, vacuum couches
25. Change and wash sheets and towels, vacuum
26. Wash and vacuum baseboards
27. Sweep and mop great room.
28. Take a rest; put your feet up and relax
29. Wipe out fridge and purge old food
30. Reorganize something (pantry, linen closet, etc.)
31. Choose a seasonal chore (clean the fireplace, clean the porches, etc.)

The first month it will probably take more time since some of the stuff has not been done in awhile. I wanted to make sure somethings got done once a week, while others only once or twice a month. We are lucky and have a huge house but it makes cleaning overwhelming sometimes. With this I can get something done everyday. Plus I look at the list and I think...hmmm...I only have to get one thing done today, I hope it helps!

Sunday, January 8, 2012

Homemade Biodegradable Seed Starters: Updated

Update below.

I found this the other day and thought I should share it. Homemade Biodegradable Seed Starters from Toilet Paper Tubes...what a great idea, right?


All you have to do is cut a toilet paper tube in half (or a paper towel tube in quarters or maybe more) and fill it with potting soil, then use as you would normally use a seed starter. Simple...easy...and best of all, FREE! Thanks goes to NW Edible for the idea! :)

So after trying this...I DO NOT recommend it. Once wet the glue released and created a mess. They fell completely apart. I guess you could put tape around them and then take it off when you transplant but I would just recommend using something else. Sorry if any of you already tried it.

Tuesday, October 18, 2011

A green alternative to store bought sponges...Knit a reusable one!

I recently realized how wasteful I was when it came to sponges. They get dirty so fast and there is really no way to sanitize them. So what to do? Stop washing dishes...no! It relaxes me...one thing I actually enjoy doing...I know I'm weird. I decided that I would knit something to replace them, it was really simple.

Basically knit (or crochet) a square double the size of a regular sponge, then fold in half and sew shut...your done! I used cotton yarn so that I could just throw it in the washer and dryer. It doesn't dry out very well so I recommend making at least three depending on how often you do laundry. I also made one in a different color for the bathroom, this way I will never get confused. I'm somewhat of a germ freak when it comes to certain things, toilets being one of them.

I have been using these for the past 6 months and they have been working great!


Thursday, October 13, 2011

Root Simple: Quick and Easy Fire Starters

We made these last week with things we had around the house.

Root Simple: Quick and Easy Fire Starters: "I came across these fire starters this week while sorting out our camping gear, and thought I should blog about them..."

I suck at starting fires...the doctor is always in charge of the fire but using fire starters makes it pretty easy to start a fire. So when I found these on one of the blogs we follow, we figured we might as well try them. Wow, they work really well! He decided we needed to used 6 to start a fire. Of course you really only need one or two.

You really only need a paper egg carton, dryer lint, and an old candle. So much cheaper than buying fire starters at the store. I also feel like they are probably better for the environment. They were so easy to make and use. These would be great for campers and fires at home.


Thank you to root simple for the info!

Thursday, September 15, 2011

Reflection of the spring/summer garden and pictures as of late

Please note this blog is no longer updated. (Click here to find my new blog address).


Our second crop of Missouri Bill's Pole beans (a dry/shelling bean)

the start of some Mache

our first melon, with basil in the background

The start of some purple snap peas

our first pumpkin
We were so excited when we moved in November to have the space to actually be able to have a real (not in bins) garden. If you are a gardener you must be able to admit your mistakes and learn from them...

In the early spring (really winter) we started our seeds inside and barely got anything. We were so discouraged and worried that we bought more seeds from Redwood Organic Farm (thank goodness we found them) and started over. I kept reminding myself that no matter what happened we would at least learn something. Let me just say you can trust that anything you get from redwood will come up, we ended up with so much that we were trying to get rid of plants!

Boy did we learn this year! We followed a book to space our 90ish tomato plants and now we know that they need a lot more space than the book said! It is like a jungle in our tomato area and I think that next year less (spaced and supported better) will be more. Luckily we never really had a problem keeping up with the harvest and the girls(chickens) could not have been happier to take care of the hornworms.

We planted 4 summer squash plants and 3 of them really produced. Really what were we thinking...4!? No one in northern California needs more that one summer squash plant...they go crazy! We did find a way to use all of it up though, whether it was in smoothies, bread, zucchini pickles (blog post to come), of course steaming it or just cutting it in half and giving it to the girls.
This was our first try at growing dry/shelling beans, soybeans and garbanzo beans; let me just say...OMG! I wish we could grow only legumes! As soon as the first crop was done we started a second and although so far we didn't get as much as we wanted, it was so rewarding and great for the soil...a blog post to come.

I don't ever want to grow corn again (unless we have goats), we have a great local source that sells perfect yummy corn...really, why bother with it. Our corn this year was kind of sad. So far we have only had one ear that we could eat and the rest was taken over by bugs before it really became anything...so the lucky lil' girls have had many feasts of corn!

We are on our 4th planting of potatoes. So far the first (an early spring planting), is the only one to talk about...wonderful, large, yummy potatoes...the second and third were small but yummy. I hope the fourth is awesome because we want to use them for thanksgiving dinner!

Our peppers...hmmmm...where to start. The first seeds(I won't name the company because it could have just been a fluke) we bought never came up, then we planted a second set using a seed mat...nothing. Then we finally gave in a got some starts from the market. They are producing a lot of yummy peppers but they are so short and small that I think maybe we put them out to early and stunted them. We also wanted jalapenos and another spicy variety. We picked up a few at the market and the first two never made it. Then we grabbed another jalapeno but the peppers that we are harvesting (off the 3 inch tall plant, crazy short) are in no way, shape or form jalapenos.

Our first planting of carrots was wonderful...amazing, yummy, perfect. Our second never came up, our third...we ended up with 3! Lesson learned....you have to water seeds a lot throughout the day if you live where it is hot!

Onions and garlic; we were so excited to try that we did not do any research! Big mistake, although we made the most of it. First, we did not plant nearly enough considering we wanted to use then to make marinara sauce. Second, we didn't research to find out which types store well, although it didn't matter to much because it was all used up before they could really go bad. Third, we learned a new way to store garlic! Dehydrate it for garlic powder, blog post to come!

All of the herbs were wonderful, the only thing we will change is where we plant the herb garden. They ended up in a place that could have been used much better. We are planning on digging them up and placing them in pots so we can pull them in close to the house for winter and/or inside at night. Then re-plant them next spring in a better spot.

I gained a new love this year in my picky palate...Swiss chard! I never used to like it but for some reason I am now in love with it and Kale. Our Swiss chard was great this year until we accidentally took it out with the hula-hoe...oops! We also got a Kale plant from the market this year and although the bugs love it and we didn't really have room for it so it was not planted in the best spot...it is still going strong. Our lettuce was wonderful until the heat hit...then the caterpillars got it so we are trying different varieties in our fall/winter garden this year. I hope next summer to find a good variety for our hot weather.

The West African millet was amazing! Since the Doctor spent four years in Africa we wanted to try his hand at growing it here and making it into beer. We will be writing a blog post about the beer making.

We purchased melon seeds this year but they never came up...bummer. Later in the summer we buried a couple seeds from a melon we ate and we now have two melons growing...crazy!

Our watering system actually works out quite well, we did end up adding a second one. Once the tomatoes and Peppers had fruit on them we had to be more careful but they were all pretty well supported so it didn't matter to much. It was really nice to be able to walk out and turn on the timer, then the hose and walk back in the house knowing that half the garden was being watered all at once! Of course we still have to spot water some things that it does not reach but all in all it really helped us out timing wise and helped the plants really develop a strong root structure.

All in all we learned a lot...that is what we are most thankful for. We know that it is going to take us years to fully understand everything but since we love it so much we are excited to keep at it. What an awesome hobby to have...you enjoy what you do and feed yourself at the same time.

Wednesday, August 31, 2011

homeschooling a preschooler

Please note this blog is no longer updated. (Click here to find my new blog address).


We are taking our time to decide if we will be homeschooling or public/charter/private schooling the little guy but I wanted to start something with him at home to challenge him a little more. I started searching on the Internet and got a bit overwhelmed to be honest. This is what I finally came up with. It is very simple and easy but it gives us a focus for the week.

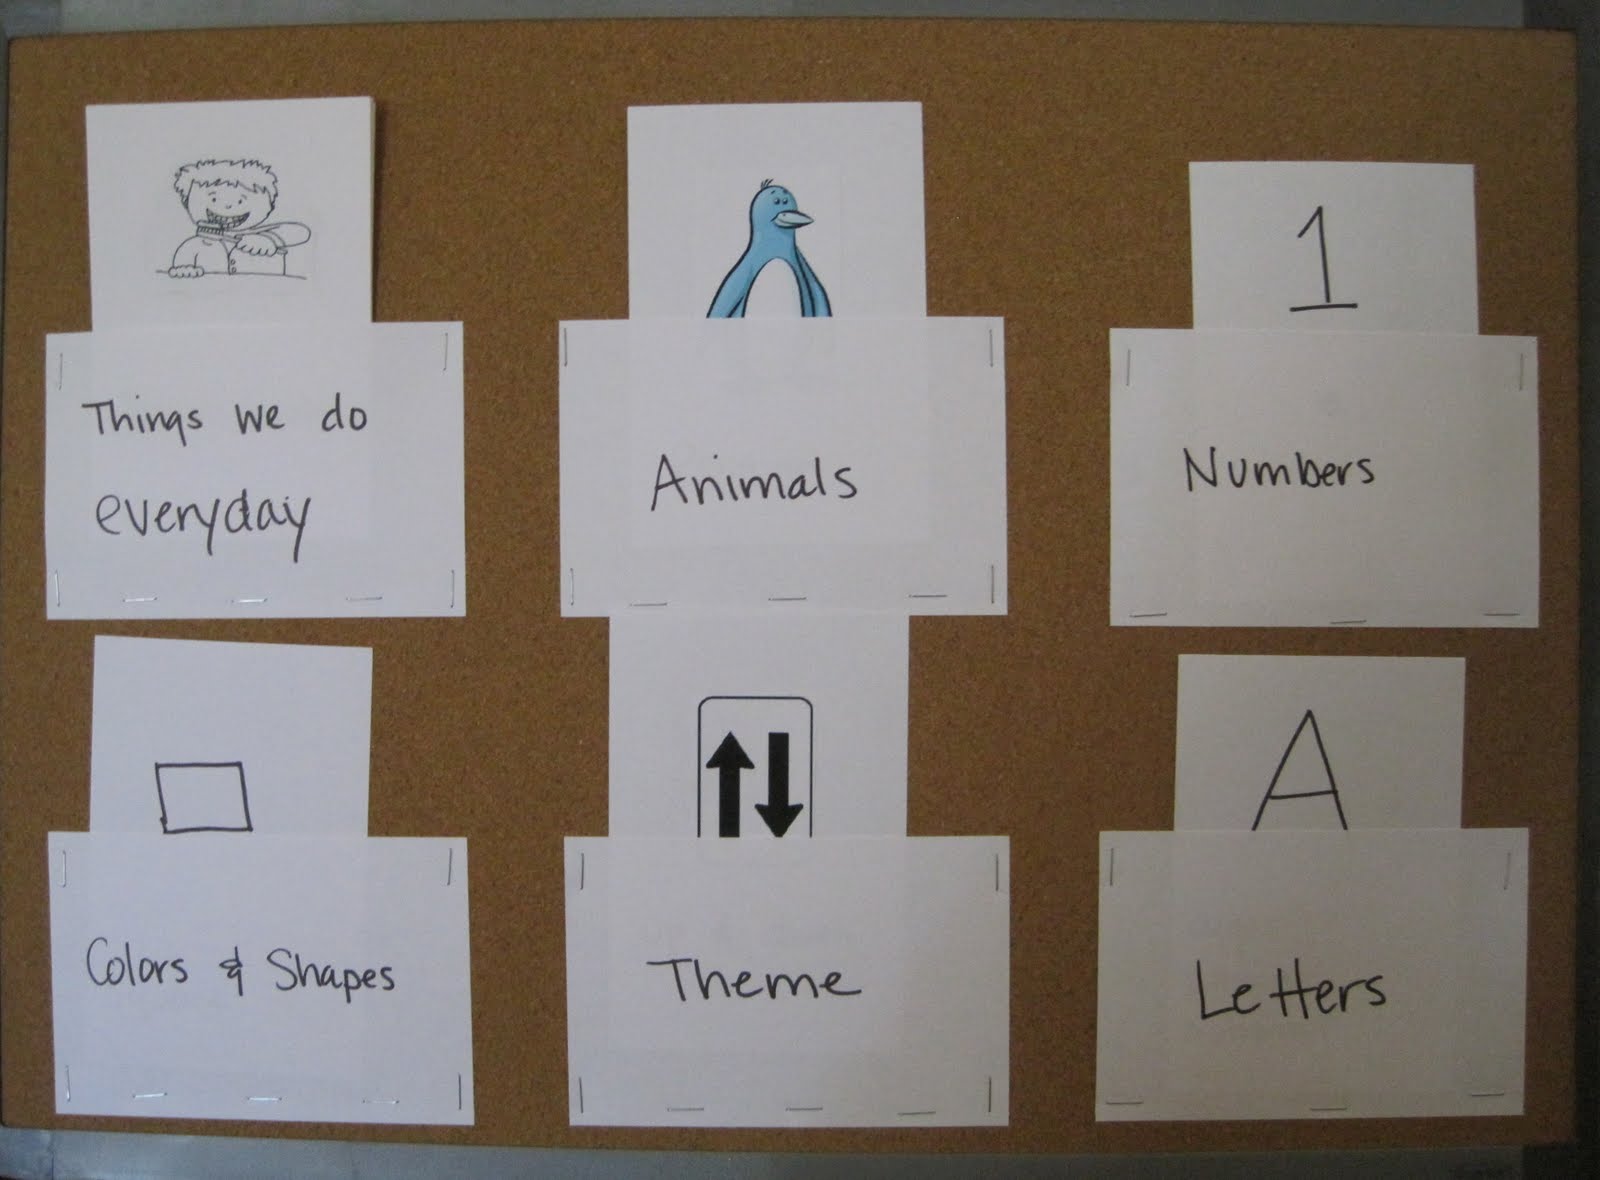
simple and easy...cork board with pockets
I put together a cork board with pockets for each category, which I will change out each week. We will focus everything(reading, puzzles, coloring, crafts, etc.) on the five things of the week. The category: Things we do everyday will of course not change. I plan on showing it to him on weekdays (we've started with three days a week) and then we will go on with our day. I will use it to focus on those things...pointing out the circle if it circle week for example.


Categories

Things we do everyday: brush teeth, listen, clean up, make our bed, get dressed, go potty, eat healthy, sharing, etc. I added this so we have a daily routine that he can look at and check off as he goes. Plus it enforces good daily habits.

Letters: A-Z adding three words for each, I choose some words he didn't know and some he knows but doesn't pronounce correctly.

Numbers: 0-20 adding the number in dots below. I just found this website that has printable letter and number flash cards, after I made them all of course.

Shapes/Colors: square, diamond, star, circle, rectangle, oval, heart, triangle, crescent, green, blue, red, yellow, black, white, brown, purple, pink, orange, and grey.

Animals: I came up with 26 (how many letters we have) that we had at least two examples of at home (from a book, toy, in the back yard, etc.).

Themes: up/down, tall/short, hard/soft, hot/cold, day/night, little/big, family, feelings, farm, jungle, transportation, body parts, plants, ocean, music, neighborhood, weather, emergency personal, forest/river and meals/utensils.

Sub-themes: birthday, Easter, 4th of July, Halloween, thanksgiving, Christmas, and seasons.

Most programs have you do 26 to go along with how many letters but I plan on rotating the themes and using the sub-themes the weeks surrounding the holiday, weather pattern or season. I also felt that we should work on things he needs to know not add extras to make the amount work out.

Two websites I found helpful in creating our program:
Letter of the week
Our preschool homeschool

I also got a lot of help from my mom, who ran a daycare when I was a child. So far we are starting our third week and he seems to be really enjoying it. I have already noticed a few things that he has learned and a few things he is now pronouncing better. I will also post some of the crafts, science projects, games, etc. we come up with along the way.

Thursday, July 7, 2011

Simple smoothie recipe

Please note this blog is no longer updated. (Click here to find my new blog address).


Are we the only ones with lots of fruit and veggies left over from the 4th of July celebration? My mom brought a flat of peaches, and a watermelon. We were busy all weekend and kind of forgot about harvesting zucchini, so we have four huge ones that are not going to taste the best. They would be perfect for bread or grilling but we don't have grill and its to hot to use the oven. The little guy loves bananas or as we call them bugabugas but he doesn't always eat the whole thing, so I have been putting them in a freezer bag so they don't go to waste. All of this adds up to this mornings inspired idea...

I was searching for zucchini recipes to use this stuff up in a different way then plain old steaming and I saw recipes for smoothies. What a great way to sneak in more veggies, use them up and have a yummy breakfast. The little guy is really great about eating veggies so I never worry much about that but I figured the more the better.

4 strawberries
1/2 banana
1 peach
1/4 c or so watermelon
1/8 c or so zucchini diced
blend and splash in some juice or water if needed. We found this great juice that the little guy loves it has cranberries, banana, strawberries, sweet potato, carrot, and beets.

It made enough for the little guy to have some with his oatmeal, I had a small glass and I made a popsicle with the rest. Perfect breakfast treat for both of us, plus no sugar added!

Friday, May 6, 2011

How to make one whole chicken into over 6 meals.

Please note this blog is no longer updated. (Click here to find my new blog address).
 
 
First, off start by cooking a whole chicken. We usually take out the giblets and rinse everything. Then place it all in a roasting pan with a few potatoes, carrots, an onion cut in half and a head of garlic cut in half. We stuff a few tablespoons of butter under the breast skin, and again baste the skin with butter. Its a good idea to season the skin after basting, we use salt and pepper, but the addition of lemon thyme or sage is great. We also pour water or chicken stock into the cavity to make it more moist. Now you seal the top with tin foil, make it a nice seal around the baking dish, it really helps keep the bird moist. We usually bake it at 350 degrees for 1.5 to 2 hours covered, and then another 15 minutes on broil. Finally, it's time for dinner (this is the first meal). Then the next two nights (meals two and three) we either re-heat it in the oven and have the same thing or cut pieces off to add to other meals.


The next morning we pick off all the rest of the meat and seperate it into meal sized portions in freezer bags. This time I only got three bags (meals four, five, and six). You can skip this step and just move forward to the next if you think its gross. It is gross to pick a chicken but I usually use gloves and I've become used to doing it.


Then you add your mirepoix to a large pot. A mirepoix is a combination of onions, carrots, and celery, I also add three or four bay leaves and ten to twelve whole black pepper kernels. It doesn't need to be chopped perfectly, I just break the celery ribs to fit into the pot along with the carrots (I only had baby carrots on hand this morning, so I used them instead of whole) and cut off the ends of the onion. You are now making chicken stock. :)


Add in the chicken carcass, juices and any other left overs from the roasting pan. Then cover with water and bring to a boil. I really like using my pasta pot to make stock because when your done you can just pull all of the bones, veggies, etc. up and out instead of trying to use a strainer.

Once boiling reduce to a simmer for at least 4-5 hours. I usually cook it all day, the longer it cooks the more rich and healthy it will be. Once it has finished cooking, strain out bones, veggies, etc., cover and place in the fridge over night. In the morning scrap off all fat and taste. I sometimes have to reduce it down even more for a richer stock, which usually means about 2 or more hours of simmering.


We then pressure can or freeze the stock and use it to make more meals, almost every time we make rice we use chicken stock instead of water to cook it in. Voila! You have made one chicken into over 6 healthy home-made meals, now sit back and put your feet up...you deserve it!

Saturday, April 2, 2011

Watering your garden quickly...

Please note this blog is no longer updated. (Click here to find my new blog address).


We took an inexpensive oscillating sprinkler and attached it with zip ties to a piece of plywood.  We set the range to maximum (180 degrees) and drilled a pilot hole in the plywood.


We attached the device atop a post and then hooked up the hose.


It actually does a great job of watering the largest part of our garden, about 3200 square feet.

Related Posts Plugin for WordPress, Blogger...